역주: 이 포스트를 읽기전에 스프링 보안 폼기반 기본인증에 대해 읽어본후에 보면 이해하는데 도움이 될것이다.
Spring Security: 커스텀 토큰 기반 스프링 REST인증
REST 리소스에 접근하기위한 인증으로 세션을 사용하지 않는 토큰 기반 메커니즘을 구현하고 싶고 스프링 시큐리티를 사용하길 원할때 이 포스트는 도움이 될것이다.
다음과 같이 해야할것이다.
1. CustomToken Authentication filter 를 구현합니다. 이것은 디폴트 폼 기반의 UsernamePasswordAuthenticationFilter
를 대체할것이며, 곧 보여줄것입니다.
어떤 토큰을 만들것인지는 그저 당신에게 달려있습니다. 다음 프로젝트를 보시죠.
https://code.google.com/p/jsontoken/source/checkout
일반적으로 사용자ID,타임스탬프,만기날짜,클라이언트의 IP를 가진 문자열을 대칭형 개인키로 암호화해서 만듭니다.
또한 그것을 Base64 로 인코딩하여 문자열로 만듭니다. 서버에서 토큰을 받으면 그것을 복호화할수있는데, 복호화가 성공하면
그 의미는 서버에서 보냈던 토큰과 일치한다는것이겠지요.
또한 ip 주소를 얻을수있으며, 만약 보낸이가 당신이 발행했던 (issued) 사람과 동일한지와 만기날짜등을 체크합니다.
여기에 패스워드는 전혀 필요가 없습니다. 그 이유는 이 암호화된 토큰은 처음에는 유저/패스워드를 통한 서비스를 통해 인증된
후에 발급되어진것이기때문입니다. (역주: 토큰을 만들기위해서 처음 한번만 비밀번호가 필요함)
만약 그것을 복호화할수있으면 토큰을 발행한 오직 그 한사람인게 분명할것입니다. 당신이 만든 필터에서는 오직 유저id에 기반
하여 인증정보를 가진 스프링 유저 상세 객체를 설정하거나 로드할수있을것입니다.후에 코드를 통해서 자세히 살펴보겠습니다.
2. AuthenticationEntryPoint 를 구현하자. 이것은 스프링이 보낸 요청이며 인증되지 않은것이다. 디폴트는
LoginUrlAuthenticationEntryPoint 이며 로긴폼을 보낸다. (역주: 인증되지 않은 요청에 대해서 클라이언트에게 로그인폼형식의 페이지를 보여준다) 대신해 REST 에서 제대로된 토큰없이 API 콜이 오면 ,보통 인증되지 않은 401 코드를 보내준다.
3. 당신은 커스텀 성공 핸들러를 와 디폴트를 오버라이드 할 필요가있다. 이것은 스프링이 보낸 요청인데 만약 인증이 성공하면
디폴트는 SimpleUrlAuthenticationSuccessHandler이다. 디폴트 리다이렉트는 home page/URL 을 요청하고 Http code 301 을 가지고있는 브라우저로 부터 리다이렉트 라운드트립을 기억한다.
당신이 해야할것은 REST 경우의 성공시 URL 로의 서버사이드 포워드 요청이다.
4. 당신의 보안설정을 스프링 XML 에 정의하고 그것이 세션리스(sessionless)임을 기억하라.
CustomToken Authentication filter
1 2 3 4 5 6 7 8 9 10 11 12 13 14 15 16 17 18 19 20 21 22 23 24 25 26 27 28 29 30 31 32 33 34 35 36 37 38 39 40 41 42 43 44 45 46 47 48 49 50 51 | public class CustomTokenAuthenticationFilter extends AbstractAuthenticationProcessingFilter {
private static final Logger logger = LoggerFactory.getLogger(CustomTokenAuthenticationFilter.class);
public CustomTokenAuthenticationFilter(String defaultFilterProcessesUrl) {
super(defaultFilterProcessesUrl);
super.setRequiresAuthenticationRequestMatcher(new AntPathRequestMatcher(defaultFilterProcessesUrl));
setAuthenticationManager(new NoOpAuthenticationManager());
setAuthenticationSuccessHandler(new TokenSimpleUrlAuthenticationSuccessHandler());
}
public final String HEADER_SECURITY_TOKEN = "X-CustomToken";
/**
* Attempt to authenticate request - basically just pass over to another method to authenticate request headers
*/
@Override public Authentication attemptAuthentication(HttpServletRequest request, HttpServletResponse response) throws AuthenticationException, IOException, ServletException {
String token = request.getHeader(HEADER_SECURITY_TOKEN);
logger.info("token found:"+token);
AbstractAuthenticationToken userAuthenticationToken = authUserByToken(token);
if(userAuthenticationToken == null) throw new AuthenticationServiceException(MessageFormat.format("Error | {0}", "Bad Token"));
return userAuthenticationToken;
}
/**
* authenticate the user based on token
* @return
*/
private AbstractAuthenticationToken authUserByToken(String token) {
if(token==null) {
return null;
}
AbstractAuthenticationToken authToken = new JWTAuthenticationToken(token);
try {
return authToken;
} catch (Exception e) {
logger.error("Authenticate user by token error: ", e);
}
return authToken;
}
@Override
public void doFilter(ServletRequest req, ServletResponse res,
FilterChain chain) throws IOException, ServletException {
super.doFilter(req, res, chain);
}
}
|
1 2 3 4 5 6 7 8 9 10 | public class NoOpAuthenticationManager implements AuthenticationManager {
@Override
public Authentication authenticate(Authentication authentication)
throws AuthenticationException {
return authentication;
}
}
|
1 2 3 4 5 6 7 8 9 10 11 12 | @Component
public class RestAuthenticationEntryPoint implements AuthenticationEntryPoint {
protected final Log logger = LogFactory.getLog(this.getClass());
@Override
public void commence(HttpServletRequest request, HttpServletResponse response,
AuthenticationException authException ) throws IOException, ServletException {
String contentType = request.getContentType();
logger.info(contentType);
response.sendError( HttpServletResponse.SC_UNAUTHORIZED, "Unauthorized" );
}
}
|
1 2 3 4 5 6 7 8 9 10 11 12 13 14 15 16 17 18 | public class TokenSimpleUrlAuthenticationSuccessHandler extends SimpleUrlAuthenticationSuccessHandler {
@Override
protected String determineTargetUrl(HttpServletRequest request,
HttpServletResponse response) {
String context = request.getContextPath();
String fullURL = request.getRequestURI();
String url = fullURL.substring(fullURL.indexOf(context)+context.length());
return url;
}
@Override
public void onAuthenticationSuccess(HttpServletRequest request,
HttpServletResponse response, Authentication authentication)
throws IOException, ServletException {
String url = determineTargetUrl(request,response);
request.getRequestDispatcher(url).forward(request, response);
}
|
1 2 3 4 5 6 7 8 9 10 11 12 13 14 15 16 17 18 19 20 21 22 23 24 25 26 27 28 29 30 31 32 33 34 35 36 37 38 39 | public class JWTAuthenticationToken extends AbstractAuthenticationToken{
private static final long serialVersionUID = 1L;
private final Object principal;
private Object details;
Collection authorities;
public JWTAuthenticationToken( String jwtToken) {
super(null);
super.setAuthenticated(true);
JWTParser parser = new JWTParser(jwtToken);
this.principal=parser.getSub();
this.setDetailsAuthorities();
}
@Override
public Object getCredentials() {
return "";
}
@Override
public Object getPrincipal() {
return principal;
}
private void setDetailsAuthorities() {
String username = principal.toString();
SpringUserDetailsAdapter adapter = new SpringUserDetailsAdapter(username);
details=adapter;
authorities=(Collection) adapter.getAuthorities();
}
@Override
public Collection getAuthorities() {
return authorities;
}
}
|
마지막으로 다음 엔트리를 스프링 보안 XML파일에 넣어라. 이것은 restAuthenticationEntryPoint 로 제공된 코드를 가진 빈이 이미 정의되있다는것을 가정한다. 또한 당신의 커스텀 필터는 FORM_LOGIN_FILTER 를 대체한다는것을 알린다.
1 2 3 4 5 6 7 8 9 10 11 12 13 | <security:http pattern="/api/**" entry-point-ref="restAuthenticationEntryPoint" use-expressions="true" auto-config="false" create-session="stateless" >
<security:intercept-url pattern="/api/token" access="permitAll" />
<security:custom-filter ref="authenticationTokenProcessingFilter" position="FORM_LOGIN_FILTER" />
<security:intercept-url pattern="/api/**" access="isAuthenticated()" />
<security:logout />
</security:http>
<bean class="com.sanjay.CustomTokenAuthenticationFilter"
id="authenticationTokenProcessingFilter">
<constructor-arg type="java.lang.String"><value>/api/**</value></constructor-arg>
</bean>
|
RESTful Spring Security with Authentication Token
Recently I had to do some “research” how to use Spring Security for a RESTful API serving rich JavaScript UI. There were also questions whether to use Spring Security at all, but as of now, we’re still deciding to take this path. While it is possible to have a JSON API that is not really RESTful and we can have HTTP session behind it all, we decided to go with REST. That sets the scene: REST, Spring Security and token-based authentication.
HTTP authentication and tokens
Big question is what mechanism of authentication we want to use. If for nothing else, than at least for username (login) and password we will have SSL/TLS in place, so let’s say we will have HTTPS there all the time. This blurs the difference between classical HTTP Basic and Digest access authentication. So I decided to support Basic only for simplicity. For even easier development I introduced custom X-Username and X-Password headers, which allowed to test my solution with curl and similar tools entering plain values.
I’ve read more than a couple of articles and while I hardly became an expert on security, authentication (with HTTP or not), REST or tokens, I felt I got the basics. I also got familiar with enough ideas that I had to do some choices. I thought it would be easier, but obviously there are many ways how to construct a token. And people are probably still inventing more. So I decided to use randomly generated token that does not utilize user’s password at all – but it doesn’t really matter. You somehow create that token, that’s it. I aimed for solution that allows me to change this behavior easily.
There is also questions whether one token is enough, should you transfer it in HTTP headers or utilize HttpOnly cookieso that JavaScript can’t “share” it with some attacker, etc. Way too many questions and if you feel like, you can share your ideas and reasons in the comments. For I’ll focus on server side now, that is the part related to Spring Security. The landscape here is not that deserted actually – and I got lucky I stumbled upon this StackOverflow question which lead me to this demo on GitHub. I have to admit that some parts are from there and for other parts I used it at least as to check my solution.
Spring Security for REST?
Book Spring Security 3.1 by Robert Winch and Peter Mularien was another important source of understanding what is happening here. I tackled Spring Security before but never had a chance to go in-depth (that is beyond reactive Google/StackOverflow and some reference documentation reading), mostly because I tried to get in-depth with something else. Now was the time to understand what this framework is about. Good book, nice examples – maybe some UML class diagrams would help when introducing new important classes and interfaces and their roles.
The result is my take on RESTful Spring Security – it’s not really that revolutionary, but I tried to do couple of things differently. I even provided UML diagram. :-) So I’ll copy it from README.md right here, ok?
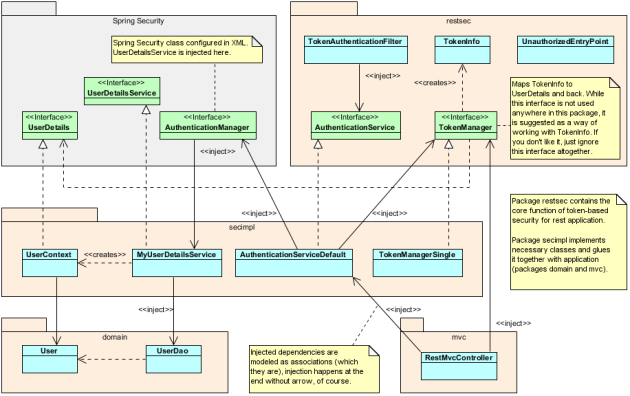
Now what is going on here and – if you insist – how is this different from philipsorst’s solution?
- I wasn’t interested in real UI, so I tested it with any REST testing extension you can find, or with curl. In the end I even put together mini-framework based on bash and curl. :-)
- I wasn’t interested in JPA/DB. I wanted as little frameworks thrown in as possible. So there is DAO with hardcoded users.
- I also wanted to come up with design that clearly separates the concept (package restsec) from any concrete implementation (secimpl), principles from details, Spring Security from the domain/application code (domain/mvc). Looking at the class diagram I think I did quite well.
- I wanted to try access control configured in XML and using annotations like @PreAuthenticate.
- Then there are some side-quests – I practiced some Gradle in combination with Spring Boot as my Bill Of Materials (kinda Maven style import scope) and I tested WildFly 8.1 (not really important).
- Finally – I wanted to document it sufficiently, both in code (comments) and in README + planned this post too. For self documentation. It pays off. I don’t remember what I need to do to make client certificates up and running on Tomcat, but I know where to look at (if it is not obsolete yet). And I used my own articles here and there already! (Actually, even my colleagues googled out my articles and found them helpful – you can’t imagine how it made me proud. ;-))
Spring Security going session-less
So how is it all working together? Because everything related to HTTP and authentication is concentrated essentially in TokenAuthenticationFilter, you don’t need any unprotected login URL. Filter is sitting in Spring Security filter chain, specifically in FORM_LOGIN_FILTER position. All you need is to provide authentication headers in any request. Because we are RESTful, we don’t want to utilize session at all. If you check spring-security.xml, this is set in http element:
1 2 3 4 5 | <http realm="Protected API"
use-expressions="true"
create-session="stateless"
entry-point-ref="unauthorizedEntryPoint"
authentication-manager-ref="restAuthenticationManager">
|
It is important to set it to stateless (don’t use session at all), not to never (which allows Spring Security to use if it somehow exists already, just don’t create it).
Let’s stop at this statelessness for a while, shall we? This does not mean that there is no server-side state at all. It just means that we don’t work with HTTP session. We still need to remember valid tokens – we may do so within DB, application context, shared distributed memory, wherever – that is definitely stateful. But from HTTP standpoint, we should be RESTful enough now. Also we utilize Spring’s SecurityContextHolder because it makes sense if you want to benefit from other Spring Security stuff, like their annotations, etc. This way we smuggle our security information using a thread-local variable (default behavior) during each single request.
Anonymous access
Before we get to business, let us see how anonymous access works first. For that assume that these are our first request and we didn’t authenticate before. In the following sequence diagrams, grey stuff is from Spring, rest is ours.

As any other model, this one is not complete or exact. Our filter is part of Spring Security chain and definitely is not called directly by browser. But in any case it’s the first moment we are interested in. Virtually every request goes through this filter (unless it avoids part of the application secured Spring Security completely). If we are accessing something available for unauthenticated user, we get what we want.
Second scenario tries to access something protected. This will not get to our Spring MVC controller:
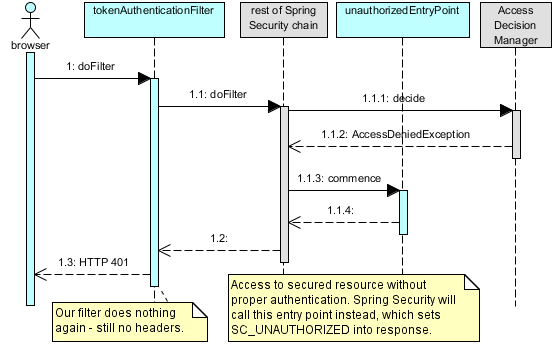
It actually gets all the way to its proxy (in our case CGLib based, because our Controller does not implement any interface) and there an implementation of AccessDecisionManager finds out that anonymous user can’t access the method and AccessDeniedException is thrown. This is caught by ExceptionTranslationFilter (part of Spring Security chain) which calls authentication entry point for this kind of exception. Normal applications use the entry point it to redirect to a login screen. We don’t want to do that, but we need to implement it, so it sets the HTTP response status (401).
It’s very easy to debug it all and it’s very nice to browse through Spring code. Maybe Spring got big and complex (well it does a lot of things now), but their code is on the positive side of quality spectrum – understandable and well documented.
Login, login! Login this lap!
(Sorry, F1 race today, you know.) Four things may be happening in our application. You may be anonymous, you may be authenticated already, you’re logging in, or logging out. My implementation tries not to mix things together much, you should do just one of these things in a single request. Let’s log in to get authenticated. Login request can continue to the REST resource and return data, but I chose otherwise. This can be reimplemented of course –TokenAuthenticationFilter#checkLogin would call doNotContinueWithRequestProcessing only if the response is not 200. But currently it works this way. Here is the diagram:
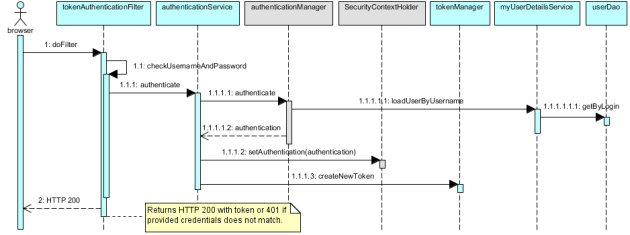
If our filter finds information that looks like login (and it must be POST), it will pass username/password toAuthenticationService. This is still our part of solution and glues the filter with the rest of Spring Security. It calls Springs AuthenticationManager, which in turns calls our implementation of UserDetailsService, which provides username and password (in our case plain, not a good solution of course). Not to plague the diagram with stuff, I skipped Spring’s PasswordEncoder which helps authentication manager to decide if we can go on. If we can, we get back to our security service, which populates Spring’s SecurityContextHolder and now is the time to get the token.
For this we have separate component – TokenManager – which creates and stores the token for the user. Currently only one token per user is supported, but you can implement your own approach here. Actually if you reimplementAuthenticationService considerably, there may be nothing to call TokenManager. There’s a lot of freedom here, but I think TokenManager is the place where most of the customization can go into. How to create the tokens? How to store them? How to check them? Or expire them? However you want to answer these questions, TokenManager is your guy. You still may need to adjust authentication service or filter – for instance to add some HTTP related information (IP address?) into token.
Long story short? If everything is alright, HTTP response returns status 200 and the header X-Auth-Token contains the token next requests should use to prove who you are.
Authenticated request
Here we don’t care what HTTP method is used. After login, this should be easy to understand:
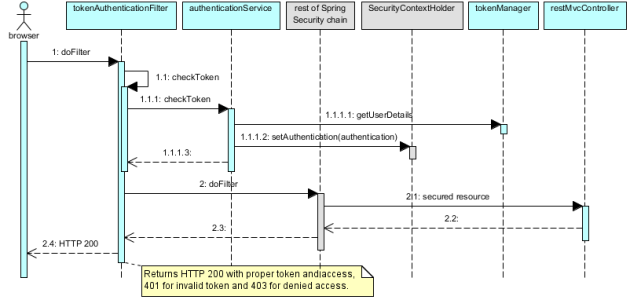
You already know all the players, here we just first check whether provided token is indeed one of those we know – and if so, we populate SecurityContextHolder. In case of 401, we don’t even bother calling the rest of the chain. The rest (cases 200 and 403) is in Spring’s hands.
Hence we can rush towards…
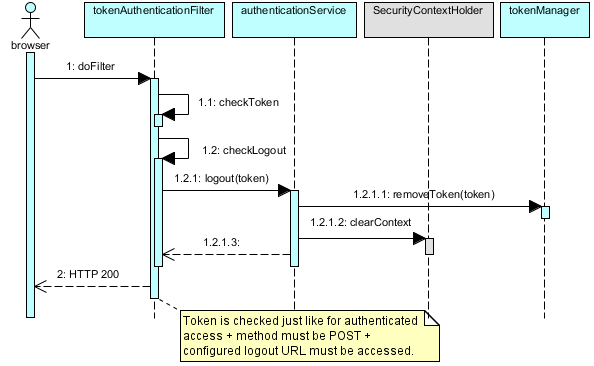
Logout
Logout should invalidate user’s sess… ehm, token, obviously. That implies valid token is provided. We also insist on POST and require specific URL. We could also request logout with another HTTP header, or with “logout” mentioned in X-Auth-Token, etc. Here it is:
And that’s it really!
Conclusion
You could see all the important players on the diagrams, some of them are our classes, some of them are part of Spring Security “auto-magic”. I’m sure even XML configuration is much clearer now. There is great deal of freedom here – you may bypass Spring Security authentication manager altogether, for instance – don’t know why, but there may be reasons.
I’m not done yet. Later we’ll need to integrate this with some reliable Windows Domain SSO authentication (so far we count on Waffle), not to mention with the rest of the application.
That “demo app” is a mix of XML configuration and annotations, so check those out, check the comments, README, etc. I really tried different things just to find out how it all works (like that mandatory ROLE_ prefix!) and I’m still probably just skimming the surface. But still better than two weeks ago. :-)
And that concludes my post and my first campaign in this war.
http://javattitude.com/2014/06/07/spring-security-custom-token-based-rest-authentication/
https://virgo47.wordpress.com/2014/07/27/restful-spring-security-with-authentication-token/
https://github.com/virgo47/restful-spring-security