가장 인기있고 성공적인 "사람 탐지기" 중 하나가 SVM 접근을 이용한 HOG 이다. 내가 2013년 4월에 임베디드 비전 서밋에 참가했었을때, 그것은 내가 들은 가장 일반적인 알고리즘이었다.
HOG 는 경사지향 히스토그램 (Histograms of Oriented Gradients ) 이고, HOG 는 피쳐 기술자 (feature descriptor ) 의 한 타입이다. 피쳐 기술자의 의도는 동일한 객체 (이 경우에는 사람) 들을 그것이 조금 다른 상태 (모습)라도 가능한 하나의 객체로 일반화하는것이다. 이것은 분류를 더 쉽게 한다.
이런 접근법을 만든이는 사람에 대한 HOG 기술자들을 인지하기위해 SVM (분류에 대한 머신러닝의 한 타입.최대한 분류사이의 갭이 크도록 계산) 으로 학습시켰다.
HOG 사람 검출기는 이해하기 간단하다 (SIFT 객체인식기와 비교하여). 중요 이유 중 하나는 사람을 묘사하기위해 "지역" 피처들의 모음보다는 하나의 "전역" 피처를 사용한다는 점이다. 이것은 사람이 단일 피처 벡터에 의해 표현된다는것인데, 사람을 작은 부분으로 표현하는 즉, 다수의 피처 벡터들을 사용하는것과는 대조적이다.
HOG 사람 탐지기는 슬라이딩 탐지 윈도우를 사용하는데 이미지를 조금씩 이동하며 검색한다. 각 포지션에서 탐지윈도우는 HOG 기술자에 의해 계산되어 학습된 SVM 에 알려지고 SVM 은 그것을 "사람" 또는 " 사람이 아닌것" 으로 분류한다.
또한 사람을 다른 스케일에서 인식하기 위해 이미지는 여러 크기로 서브샘플링되며 탐색된다.
오리지널 작업
HOG 사람 탐지기는 Dalal 와 Triggs 에 의해 CVPR 컨퍼런스 2005 에서 소개되었다. 오리지널 논문은 여기 here.
오리지널 학습셋은 여기 here.
경사 히스토그램 (Gradient Histograms ).
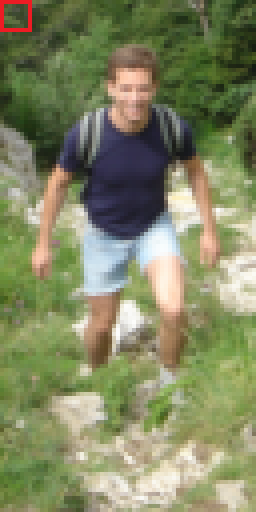
HOG 사람 탐지기는 탐지 윈도우를 사용하는데 그것은 64 픽셀 너비에 128 픽셀 높이를 가진다.
아래 탐지기의 학습(train) 에 사용된 오리지널 이미지들이 있다. 64*128 윈도우로 추출되었다.
HOG 기술자를 계산하기 위해, 탐지윈도우안의 8*8 픽셀의 각각의 셀에서 수행하고 , 이 셀들은 오버래핑된 블럭들 안에서 조작될것이다.
여기 줌인된 이미지의 한가지 버전이있다. 8*8 셀이 빨강색 사각형으로 나타나고 있으며, 우리가 작업할 셀 사이즈와 이미지 해상도에 대한 아이디어를 줄 것이다.
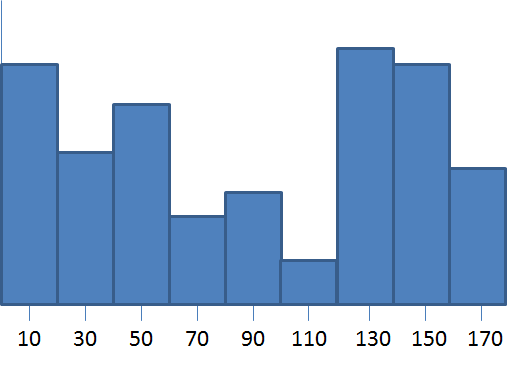
셀 안에서, 각각의 픽셀에서 경사 벡터를 계산한다.( 익숙하지 않다면 참고 gradient vectors) 64 경사 벡터 ( 8*8 픽셀) 를 가지며 그리고 그것들은 9-bin 히스토그램 ( 64 -> 9 개로 리듀스) 으로 만들어진다. 히스토그램 범위는 0~180도를 가지며, 하나당 20 도이다.
노트: Dalal 과 Triggs 는 "unsigned 경사" 를 이용했다. 그것은 범위가 0~360 이 아니라 0~180의 범위라는것이다.
각각의 경사벡터에 대해, 히스토그램의 모습은 벡터의 크기에 의해 반영된다. (강한 경사는 히스토그램에 더 큰 영향을 준다). 두가지 가장 가까운 bins 사이에서 그 기여도를 나누어지는데. 예를들어 만약 경사 벡터가 85도 라면 , 70도 와 90도 두개의 bin 에게 크기를 나누어서 배분할것이고 , (90도가 다 갖는것이 아님) 70도쪽에는 1/4를 추가할것이고 , 3/4를 90 도에 추가 할 것이다.
기여도를 나누는 의도가 두개의 bin 사이의 경계에 놓여있는 경사 문제를 최소화 하기 위함이라고 믿는다. 만약 강한 경사가 bin 의 모서리에 걸쳐있다면, 경사 각도의 약간의 변화로도 두개의 bin 사이의 값이 급격히 달라지는것 과 같이 히스토그램에 강항 영향을 줄수 있기때문이다.
왜 경사를 이렇게 히스토그램으로 놓았을까? 경사 값을 그대로 사용하지 않구서? 경사 히스토그램은 "양자화 (quantization)" 의 형태이다. 이 경우에 우리는 2개의 컴포넌트와 함께 64 벡터들을 단지 9개 값의 문자로 축소화 한다. ( 각 bin 의 크기로 ). 피처 기술자를 압축하는것은 분류기의 성능에 꽤 중요하다. 그러나 나는 주요 의도는 사실 8*8 셀의 컨텐츠를 일반화 (generalize) 하는것이라 본다.
만약 당신이 8*8 셀의 컨텐츠를 약간 망가뜨려 놓는다고 생각해보자. 당신은 여전히 동일한 벡터를 러프하게 가질 것이다, 셀 안에서 약간 다른 각도와 함께 약간 다른 포지션을 가질것이지만 말이다. 이 히스토그램 bin 들은 경사도의 각도 따라 비슷하게 만들어질 것이다. (히스토그램은 셀안에서 각각의 경사가 어디에 있는지에 대해 구분 하지 않고, 단지 셀안에서 경사의 분포에 의한다.)
경사 벡터 일반화 (Normalizing)
The next step in computing the descriptors is to normalize the histograms. Let’s take a moment to first look at the effect of normalizing gradient vectors in general.
In my post on gradient vectors, I show how you can add or subtract a fixed amount of brightness to every pixel in the image, and you’ll still get the same the same gradient vectors at every pixel.
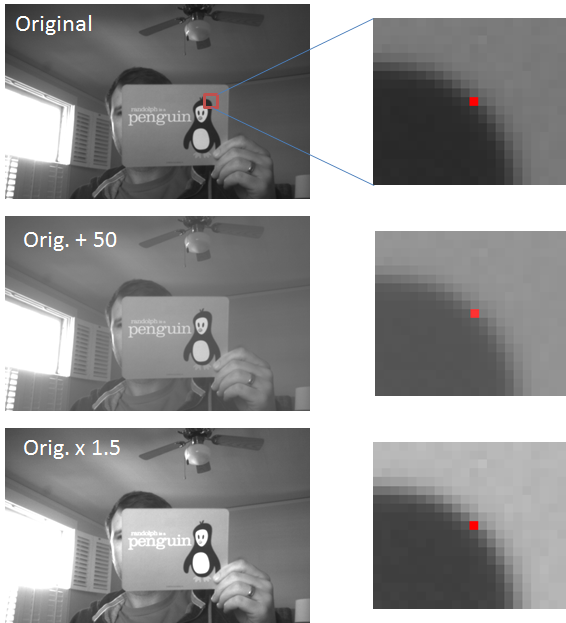
It turns out that by normalizing your gradient vectors, you can also make them invariant to multiplications of the pixel values. Take a look at the below examples. The first image shows a pixel, highlighted in red, in the original image. In the second image, all pixel values have been increased by 50. In the third image, all pixel values in the original image have been multiplied by 1.5.
Notice how the third image displays an increase in contrast. The effect of the multiplication is that bright pixels became much brighter while dark pixels only became a little brighter, thereby increasing the contrast between the light and dark parts of the image.
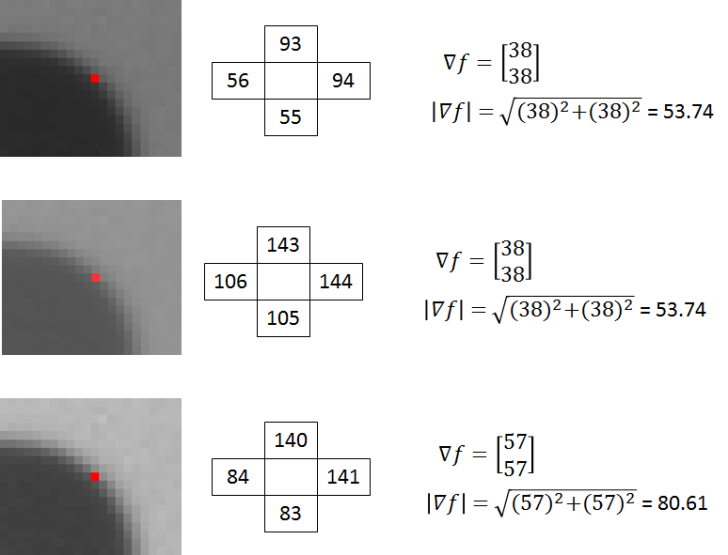
Let’s look at the actual pixel values and how the gradient vector changes in these three images. The numbers in the boxes below represent the values of the pixels surrounding the pixel marked in red.
The gradient vectors are equivalent in the first and second images, but in the third, the gradient vector magnitude has increased by a factor of 1.5.
If you divide all three vectors by their respective magnitudes, you get the same result for all three vectors: [ 0.71 0.71]’.
So in the above example we see that by dividing the gradient vectors by their magnitude we can make them invariant (or at least more robust) to changes in contrast.
Dividing a vector by its magnitude is referred to as normalizing the vector to unit length, because the resulting vector has a magnitude of 1. Normalizing a vector does not affect its orientation, only the magnitude.
히스토그램 일반화
Recall that the value in each of the nine bins in the histogram is based on the magnitudes of the gradients in the 8×8 pixel cell over which it was computed. If every pixel in a cell is multiplied by 1.5, for example, then we saw above that the magnitude of all of the gradients in the cell will be increased by a factor of 1.5 as well. In turn, this means that the value for each bin of the histogram will also be increased by 1.5x. By normalizing the histogram, we can make it invariant to this type of illumination change.
블럭일반화
Rather than normalize each histogram individually, the cells are first grouped into blocks and normalized based on all histograms in the block.
The blocks used by Dalal and Triggs consisted of 2 cells by 2 cells. The blocks have “50% overlap”, which is best described through the illustration below.
This block normalization is performed by concatenating the histograms of the four cells within the block into a vector with 36 components (4 histograms x 9 bins per histogram). Divide this vector by its magnitude to normalize it.
The effect of the block overlap is that each cell will appear multiple times in the final descriptor, but normalized by a different set of neighboring cells. (Specifically, the corner cells appear once, the other edge cells appear twice each, and the interior cells appear four times each).
Honestly, my understanding of the rationale behind the block normalization is still a little shaky. In my earlier normalization example with the penguin flash card, I multiplied every pixel in the image by 1.5, effectively increasing the contrast by the same amount over the whole image. I imagine the rationale in the block normalization approach is that changes in contrast are more likely to occur over smaller regions within the image. So rather than normalizing over the entire image, we normalize within a small region around the cell.
Final Descriptor Size
The 64 x 128 pixel detection window will be divided into 7 blocks across and 15 blocks vertically, for a total of 105 blocks. Each block contains 4 cells with a 9-bin histogram for each cell, for a total of 36 values per block. This brings the final vector size to 7 blocks across x 15 blocks vertically x 4 cells per block x 9-bins per histogram = 3,780 values.
HOG Detector in OpenCV
OpenCV includes a class for running the HOG person detector on an image.
Check out this post for some example code that should get you up and running quickly with the HOG person detector, using a webcam as the video source.
HOG Descriptor in Octave / MATLAB
To help in my understanding of the HOG descriptor, as well as to allow me to easily test out modifications to the descriptor, I’ve written a function in Octave for computing the HOG descriptor for a 64×128 image.
As a starting point, I began with the MATLAB code provided by another researcher here. That code doesn’t implement all of the features of the original HOG person detector, though, and didn’t make very effective use of vectorization.
I’ve dedicated a separate post to the Octave code, check it out here.


