
| 일 | 월 | 화 | 수 | 목 | 금 | 토 |
|---|---|---|---|---|---|---|
| 1 | 2 | 3 | 4 | 5 | ||
| 6 | 7 | 8 | 9 | 10 | 11 | 12 |
| 13 | 14 | 15 | 16 | 17 | 18 | 19 |
| 20 | 21 | 22 | 23 | 24 | 25 | 26 |
| 27 | 28 | 29 | 30 |
- Adapter 패턴
- Play2
- 스칼라 동시성
- Akka
- Actor
- CORDA
- 파이썬
- 파이썬 머신러닝
- 엔터프라이즈 블록체인
- 플레이프레임워크
- akka 강좌
- Hyperledger fabric gossip protocol
- 파이썬 강좌
- Golang
- 이더리움
- 스칼라
- Play2 로 웹 개발
- 주키퍼
- 안드로이드 웹뷰
- hyperledger fabric
- 파이썬 동시성
- play 강좌
- 블록체인
- 스칼라 강좌
- 하이퍼레저 패브릭
- 스위프트
- play2 강좌
- 하이브리드앱
- 그라파나
- 파이썬 데이터분석
- Today
- Total
HAMA 블로그
OpenCV 얼굴인식기 (with Harr Feature ) 본문
목적
이 세션에서는
- 얼굴 탐지의 기본을 살펴볼것입니다. ( Haar Feature-based Cascade 분류기를 통한)
- 눈 탐지 등 다양한 탐지를 위한 확장에 대해서도 알아볼것입니다.
기본
Haar feature-based cascade 분류기를 이용한 객체 탐지는 Paul Viola 와 Michael Jones 의 논문 ( "간단한 피처의 Boosted Cascade 를 이용한 빠른 객체 탐지" - 2001년) 에서 제안된 매우 효율적인 객체 탐지 방법이다. 많은 수의 옳고 그른 이미지들로 부터 학습된 cascade function 에 의한 접근 기반의 머신러닝이다.
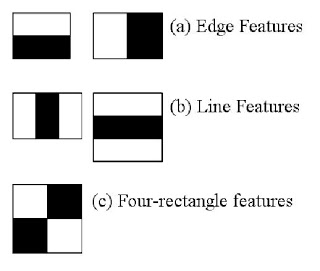
여기서 우리는 얼굴탐지를 해볼것인데, 우선 알고리즘은 많은 수의 옳은 이미지 (얼굴)들 과 그른 이미지들 (얼굴 이외의 이미지들) 이 분류를 위한 학습을 위해 필요하다. 그리고 나서 우리는 그것으로부터 특징 features 를 추출할 것이다.이것을 위해 haar features 가 사용된다. 그것들은 convolutional kernel 과 같다. 각각의 피처는 단일 값을 갖는데 , 검정색 사각형 아래 픽셀 값의 합계와 흰색 사각형 아래 픽셀의 합계에서부터 추출되어 얻어진다.
각 커널의 가능한 크기와 위치들은 피처들의 양을 계산하기위해 사용된다. ( 얼마나 많은 계산이 필요할것인지 상상해보라. 24x24 윈도우는 160,000 피처를 만들것이다). 각각의 피처를 계산하면서 우리는 흰색과 검정색 사각형아래의 픽셀의 합을 구할 필요가 있는데 이것을 해결하기위해 그들은 integral 이미지를 소개했다.이것은 픽셀의 합을 구하는걸 간소화 시킨다.
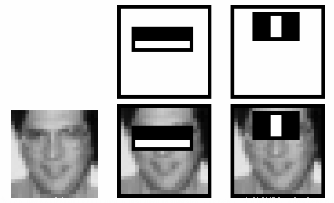
이런 모든 피처들 모두를 계산하는것은 불필요하다. 예를들어 아래 이미지를 보자. 첫번째 줄은 2개의 좋은 피처를 보여준다. 첫번째 피처는 눈 부위를 나타내는데 대부분 코나 빰에 비해서는 좀 더 어둡다. 두번째 피처는 눈은 콧대에 비해 더 어둡다는 특성을 나타낸다. 빰이나 다른 어떤 곳에 동일한 윈도우를 적용할 필요는 없어보인다. 160,000+ 의 피쳐들 중에서 가장 좋은것을 어떻게 선택할까?? 그것은 Adaboost 방법에 의해 처리된다.
For this, we apply each and every feature on all the training images. For each feature, it finds the best threshold which will classify the faces to positive and negative. But obviously, there will be errors or misclassifications. We select the features with minimum error rate, which means they are the features that best classifies the face and non-face images. (The process is not as simple as this. Each image is given an equal weight in the beginning. After each classification, weights of misclassified images are increased. Then again same process is done. New error rates are calculated. Also new weights. The process is continued until required accuracy or error rate is achieved or required number of features are found).
Final classifier is a weighted sum of these weak classifiers. It is called weak because it alone can't classify the image, but together with others forms a strong classifier. The paper says even 200 features provide detection with 95% accuracy. Their final setup had around 6000 features. (Imagine a reduction from 160000+ features to 6000 features. That is a big gain).
So now you take an image. Take each 24x24 window. Apply 6000 features to it. Check if it is face or not. Wow.. Wow.. Isn't it a little inefficient and time consuming? Yes, it is. Authors have a good solution for that.
In an image, most of the image region is non-face region. So it is a better idea to have a simple method to check if a window is not a face region. If it is not, discard it in a single shot. Don't process it again. Instead focus on region where there can be a face. This way, we can find more time to check a possible face region.
For this they introduced the concept of Cascade of Classifiers. Instead of applying all the 6000 features on a window, group the features into different stages of classifiers and apply one-by-one. (Normally first few stages will contain very less number of features). If a window fails the first stage, discard it. We don't consider remaining features on it. If it passes, apply the second stage of features and continue the process. The window which passes all stages is a face region. How is the plan !!!
Authors' detector had 6000+ features with 38 stages with 1, 10, 25, 25 and 50 features in first five stages. (Two features in the above image is actually obtained as the best two features from Adaboost). According to authors, on an average, 10 features out of 6000+ are evaluated per sub-window.
So this is a simple intuitive explanation of how Viola-Jones face detection works. Read paper for more details or check out the references in Additional Resources section.
( 동영상 링크 : https://www.youtube.com/watch?v=WfdYYNamHZ8 )
Haar-cascade Detection in OpenCV
OpenCV comes with a trainer as well as detector. If you want to train your own classifier for any object like car, planes etc. you can use OpenCV to create one. Its full details are given here: Cascade Classifier Training.
Here we will deal with detection. OpenCV already contains many pre-trained classifiers for face, eyes, smile etc. Those XML files are stored in opencv/data/haarcascades/ folder. Let's create face and eye detector with OpenCV.
First we need to load the required XML classifiers. Then load our input image (or video) in grayscale mode.
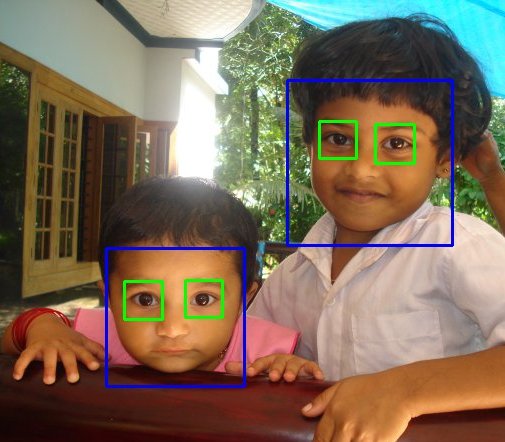
Now we find the faces in the image. If faces are found, it returns the positions of detected faces as Rect(x,y,w,h). Once we get these locations, we can create a ROI for the face and apply eye detection on this ROI (since eyes are always on the face !!! ).
Result looks like below:
'통계 & 머신러닝 & 딥러닝 ' 카테고리의 다른 글
| 딥러닝을 공부하기 가장 좋은 책 ( 딥러닝북 ) (0) | 2016.03.09 |
|---|---|
| OpenFace 얼굴인식기 (0) | 2016.03.09 |
| OpenCV 사람인식기 (HOG 파라미터 설명) (0) | 2016.03.07 |
| 사람인식 HOG, Python , OpenCV (0) | 2016.03.02 |
| 제프리 힌톤은 그냥 더 좋은 사다리를 만들었을뿐.. (0) | 2015.12.26 |
