
| 일 | 월 | 화 | 수 | 목 | 금 | 토 |
|---|---|---|---|---|---|---|
| 1 | 2 | 3 | 4 | 5 | ||
| 6 | 7 | 8 | 9 | 10 | 11 | 12 |
| 13 | 14 | 15 | 16 | 17 | 18 | 19 |
| 20 | 21 | 22 | 23 | 24 | 25 | 26 |
| 27 | 28 | 29 | 30 |
- 블록체인
- 파이썬 강좌
- 플레이프레임워크
- Golang
- 스위프트
- hyperledger fabric
- 엔터프라이즈 블록체인
- 하이퍼레저 패브릭
- 하이브리드앱
- 안드로이드 웹뷰
- 파이썬 데이터분석
- Actor
- 그라파나
- 스칼라 동시성
- 이더리움
- akka 강좌
- Adapter 패턴
- CORDA
- 스칼라
- play2 강좌
- 파이썬
- 스칼라 강좌
- Play2
- Akka
- play 강좌
- 주키퍼
- 파이썬 동시성
- Play2 로 웹 개발
- 파이썬 머신러닝
- Hyperledger fabric gossip protocol
- Today
- Total
HAMA 블로그
무들(moodle) 2.9 - 코스 홈페이지 본문
https://docs.moodle.org/29/en/Course_homepage#To_link_course_sections
코스 홈페이지
내용
빈 (blank) 코스의 표준 뷰
이번 예는 싸이트의 새로운 인스톨에 대한 표준 디폴트 코스홈페이지에 대한것이다. 이번 예와는 다른 모습을 가진 다양한 코스를 만들수있는 코스 옵션들이 있다. 이 예제 코스는 헤더,푸터, 3개의 컬럼을 가지고있다. (일반적으로 사용됨)
코스 홈페이지를 구성하는 것들
위의 이미지를 이용해서 전형적인 코스홈페이지의 부분들을 보자. 그것들은 감추거나 이동가능하고 다른 테마를 다른 지역의 불럭에 나타낼수있다. 그래서 모든 코스가 이렇게 생긴것은 아니다.
| 왼쪽 컬럼 | 코스 섹션 - 중앙 | 코스 오른쪽 |
| *1 코스 풀 네임 | *6 섹션헤더 및 새소식 | *9 로깅 정보 |
| *2 네비게이션 바 | *7 현재 위크 - 첫번째 섹션 | *10 편집 버튼 |
*4 네비게이션 블럭 | *8 미래의 위크 - 두번째 섹션 | *11 최근 뉴스 |
*5 관리자 블럭 | *12 다가오는 이벤트 | |
| *14 "Switch role to" | *13 최근 활동 | |
*15 사용자 프로파일 세팅 | ||
*16 싸이트 관리 |
코스 섹션
코스섹션은 코스페이지의 중앙에 보여진다.
코스섹션 편집하기
- 편집 기능 켜기 (Turn editing on)
- 에디트 아이콘 클릭
싸이트에 대한 Conditional activities 가 enable 되있으면 섹션(그안의 리소스및 액티비티를 포함하여) 에 접근하는것은 제한될것이다. 중앙 컬럼안의 코스섹션들은 편집기능이 켜진이후에 Administration > Course administration > Edit settings 나 코드페이지의 아래에 있는 더하기 빼기 아이콘을 클릭하므로서 바꿀수있다.
 Editing a course section |  Changing the number of course sections |
코드 섹션 이동하기
- 편집기능켜고 (Turn editing on)
- up/down 화살표 또는 섹션을 이동하기위해 크로스헤어 아이콘 클릭
- 원하는 위치로 섹션을 드래그
노트 : 코드섹션을 이동하기위해서는 moodle/course:movesections 에 의해 컨트롤되는데 이것은
선생님 디폴트 롤이면 된다.
코드섹션 삭제하기
New feature
in Moodle 2.9!
편집기능 켜고 지우길 원하는 코스섹션옆의 X 클릭하라. 내부의 모든것들이 삭제될것이며
되돌릴수없다.

코스섹션들 링크하기
New feature
in Moodle 2.9!
An admin setting Always link course sections can be enabled from Site administration>Appearance>Navigation and will link course sections so that when a course section name is clicked in the navigation block or the central content area, it will go directly to that section.
블럭
블럭은 코스페이지의 왼쪽이나 오른쪽 컬럼에 나타난다.
코스페이지에 블럭을 추가하기위해서는
- 위,오른쪽에있는 버튼이나 Administration > Course administration 을 클릭하여 편집기능켬.
- "Add block" 드랍다운 메뉴로 부터 블럭 선택 (usually situated bottom right of the page)
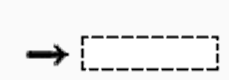
블럭이동하기 위해서는
- Ensure editing is turned on then click onto the block title until the crosshair icon appears
- While keeping the block selected, drag it to where you want to position it and let go.
Alternatively
- Click on the up/down arrow
- Click on the place holder (a zone with a dashed border) where you want the block to appear.
 Crosshair icon for moving a block |  Up/down arrow icon for moving a block |
액티비티 와 리소스
코스에 액티비티와 리소스를 추가하기위해서는
- 위,오른쪽에있는 버튼이나 Administration > Course administration 을 클릭하여 편집기능켬.
- 새로운 액티비티 선택자를 열기위해서 'Add an activity or resource' 클릭 . activity or resource 를 선택하고 Add button을 클릭하거나 activity or resource name 에서 더블클릭
- http://youtu.be/ALsa7J83NaE
If desired, the activity chooser can be switched off via Administration > Course administration > Activity chooser off. Activities and resources can then be added using dropdown menus. (The setting appears only when editing is turned on.)
Note: The Moodle admin can switch this off by default in Administration > Site administration > Appearance > AJAX and Javascript.
 The activity chooser |
Alternatively, certain resources and activities may be added using drag and drop:
- 파일 추가 , simply drag and drop it onto the course section where you'd like it to appear
- 폴더 추가 , simply zip the folder then drag and drop it onto the course section where you'd like it to appear, answer 'Unzip files and create folder' to the popup dialogue, then click the upload button
- SCORM package 추가 , simply drag and drop it onto the course section where you'd like it to appear, answer 'Add a SCORM package' to the popup dialogue, then click the upload button
코스홈페이지의 엘리먼트 편집
With the editing turned on, each item on your course homepage and each section/block will have icons next to it which all perform different functions such as edit/move/copy/delete/hide. See the screencast: Course editing improvements
Note:' Your theme may have icons different from these below:
 - the pencil icon allows you to edit inline the title of the resource / activity
 - the open-eye icon means an item is visible to students. It will close when you click on it

 - the eye with a strike through icon means an item is hidden from students. It will open when you click on it

 - the duplicate icon allows you to copy an activity or resource. It's done directly on the course page.

 - the move icon allows you to move items or sections by dragging and dropping. (If you have many activities to scroll through while moving, see the Tips and Tricks section below for a useful suggestion.)

 - this move icon appears if you don't have Ajax enabled.

 - the groups icon allows you to change between no groups or separate/visible groups

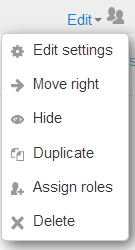 - this icon groups actions together for easier editing on smaller screens. Click to reveal the options.

 - the move here icon appears when moving a course element without Ajax. Click into the box to re-locate your item.

 - the up/down arrows allow you to move course sections up or down and appear if you do not have Ajax enabled.

 - the delete icon will permanently delete something from the course

- - the groups icon allows you to change between no groups or separate/visible groups
 - the roles icon allows you to assign roles locally in the item.

The following icons only apply to sections:
 - the highlight icon allows you to highlight a section as current.

 - the delete icon allows you to delete course sections (New in 2.9)
팁 과 트릭
Moving items in a course with many activities
If you click and drag an activity or resource on a course page which has many items, this might cause you difficulties with "scroll of death" issues. Instead of dragging the activity to move it, click on it. It will display a list of all the items on your page and you just need to click to select where on the course page you want the item to be moved to.

- Make your course home page look more like a webpage - see Course FAQ
- Activity and resource descriptions can be displayed on the course page just below the link to the activity or resource by clicking the 'Display description on course page' checkbox in the activity or resource settings.
'무들 (moodle) ' 카테고리의 다른 글
| 무들(moodle 2.9) - 주요 포인트 요약 (0) | 2015.06.10 |
|---|---|
| 무들(Moodle) 2.0 이러닝 강좌 개발 (0) | 2015.06.10 |
| 무들(moodle) 2.9 - 코스 (0) | 2015.06.09 |
| 무들(moodle) 2.9 - 무들 코스 매니징 (0) | 2015.06.08 |
| 무들 (moodle) 2.9 설치하기 for Windows (1) | 2015.06.08 |

