코스란?
새로운 코스 추가하기
일반권한의 선생님들은 새로운 코스를 추가할수없다.
다음 권한을 가진자들만이 추가할수있다. Administrator,Course Creator or Manager
코스 추가
아래로 이동
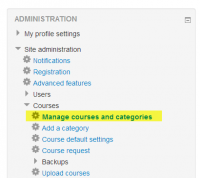
- Administration>Site Administration>Courses>Manage courses and categories
- Click on the category where you want your course to be. For more information see Course categories
- Click the "New course" link
- Enter the course settings, and then (new in 2.9) choose either to "Save and return" to go back to your course, or "Save and display" to go to the next screen.
- On the next screen,if you have chosen "Save and display", choose your students/teachers to assign to the course.
코스 템플릿
It is possible, from Administration>Site Administration>Courses>Upload courses to specify a course and settings to use as template for future courses.
Default blocks for new courses can also be configured in config.php.
이미존재하는 코스를 템플릿으로 이용하기
First, create or locate on your Moodle the course you wish to use as a template and make a note of its shortname. A template course might for example have common headings or section summaries or policy agreements used throughout the site for consistency.
Note that only the content of the course will be restored; not its settings. Settings are added separately.
방법 1
- Create your csv file. See Upload courses for accepted fields.
- From Site administration>Administration>Courses>Upload courses, add your file.
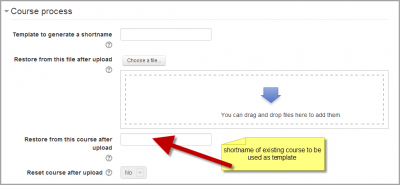
- Preview it and scroll down to 'Course process'. In the box 'Restore from this course after upload', add the shortname of your template course.
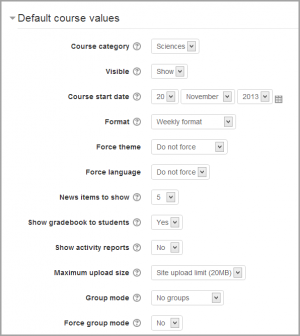
- If you are creating several courses using the same template and you wish them all to have the same settings, you can specify these in the Default course values.
- Upload your csv file.
방법 2
- All the settings and the chosen template course can be specified in the csv file you create. Use templatecourse as the field for your chosen template course, and use the course shortname. See Upload courses for full list of fields you can include.
- Here is an example of a csv file for restoring a course to be used as a template. It specifies for example the theme, language, enrolment method and alternative names for student and teacher.
shortname,fullname,category,newsitems,theme,lang,format,enrolment_1,enrolment_1_role,role_student,role_teacher,templatecourse
Knit,Knitting,2,0,afterburner,fr,topics,manual,student,NewKnitter,MasterKnitter,OMT
- Go to Administration>Site administration>Courses>Upload courses and add your csv file.
코스 카타고리
Course categories organize courses for all Moodle site participants. The default course category on a new Moodle site is "Miscellaneous" (although this can be renamed) A Course creator, Administrator or Manager can put all courses in the Miscellaneous category. However, teachers and students will find it easier to find their classes if they are organized in descriptive categories.
The list of courses within a category by default shows the teachers and the summary of each course. If the number of courses within a category exceeds 9 (10 or more), then a short list without teachers and summary is shown.
카타고리 추가
Most people organize their courses by department and college or by topic. Be sure to test the organizational scheme with a few users before entering a large number of courses, to save time in moving them later.
Adding categories is very simple:
- Go to Administration > Site administration > Courses > Add a category
- Complete the details required and click 'Create category.'
- Alternatively, you can go to Administration>Site administration>Courses>Manage courses and categories and click the link 'Create new category'.
If the category is visible, the course category description will be displayed to users when they enter the category, above the list of courses.
카타고리 편집 및 이동
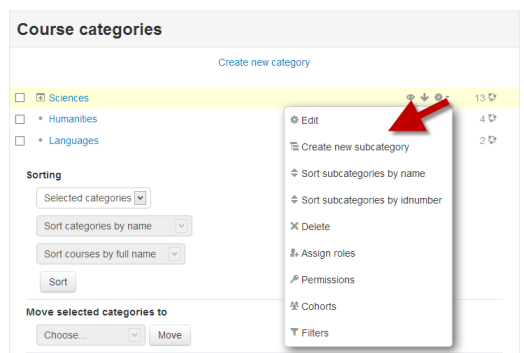
- You can edit the details of a course category by clicking the actions icon next to its name in Administration>Site administration>Courses>Manage courses and categories. and selecting 'Edit'.
- You can move categories up or down by clicking the up/down arrow next to the category you wish to move. You can bulk move categories by checking the box to the left of their name and then by selecting from the dropdown 'Move selected categories to'
서브 카타고리 추가
- Sometimes it might be useful to have a sub-category of a course. For example, you might have a category "Science" and wish to have sub-categories "Biology", "Chemistry" and "Physics".
- You can make one category a subcategory of another by checking the box to the left of its name and then by selecting from the drop down menu 'Move selected categories to' You can create a new, empty sub-category by clicking the actions icon next to its name in Administration>Site administration>Courses>Manage courses and categories. and selecting 'Create new subcategory.'
카타고리 감추기
- Categories may be easily hidden or shown via Administration>Site administration>Courses>Manage courses and categories and clicking the 'eye' icon of the category you wish to hide. Hidden categories are only visible to site administrators or those with the capability to "view hidden courses".
코스 세팅
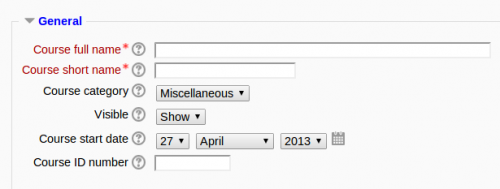
일반
코스 풀네임
This is the name of the course. It is displayed as a link on course lists on the Front page and on the Dashboard and in reports. It is also used in the browser title bar when the course is viewed.
The capability moodle/course:changefullname controls whether a user can edit the course full name.
단축이름
Many institutions have a shorthand way of referring to a course, such as BP102 or COMMS. Even if you do not already have such a name for your course, make one up here. It will be used in several places where the long name is not appropriate, such as the Navigation block.
The capability moodle/course:changeshortname controls whether a user can edit the short name field.
By default, only course full names are displayed in the list of courses. However an administrator can enable short names to be displayed too if required by ticking the checkbox in Administration > Site administration > Appearance > Courses.
코스 카타고리
The site administrator may have created course categories to help teachers and students find their courses easily. Course categories may be reflected in the Navigation block.
The capability moodle/course:changecategory controls whether a user can edit the course category.
코스 스타트 날짜
This setting affects the display of logs and the weekly format topic dates.
If you use the "Weekly" course format, the start date will appear in the first section of the course. For example selecting 27 July, will display "27 July - 2 August" in the first section (when default display is selected for that section).
This setting will have an effect on the display of logs. This will be the earliest possible date the log activity will display.
This setting will not affect courses using the 'social' or 'topics' formats.
- TIP: If your institution runs on a weekly schedule, you may want to consider setting the start date for courses on the first day of the week, like a Monday. Please note that the 'first day of the week' is set by the langconfig file of yourLanguage, and might be different from the default Monday of the English language pack.
- TIP: In general, if your course does not have a real starting date then set the date to yesterday and use the availability setting to reveal the course to students.
- TIP: See self enrolment course settings to prevent students from entering the course before a certain date/time.
가시화
Here you can "hide" your course completely. It will not appear on any course listings, except for managers, course creators, teachers and any other users with the view hidden courses capability. Even if students try to access the course URL directly, they will not be allowed to enter.
The hide/show courses capability controls whether a user can hide a course.
Note: In earlier versions of Moodle, this setting was named 'Course availability'.
코스 ID 넘버
The ID number is an alphanumeric field. It has several potential uses. Generally, it is not displayed to students. However, it can be used to match this course against an external system's ID, as your course catalogue ID or can be used in the certificate module as a printed field.
The capability moodle/course:changeidnumber controls whether a user can edit the ID number.
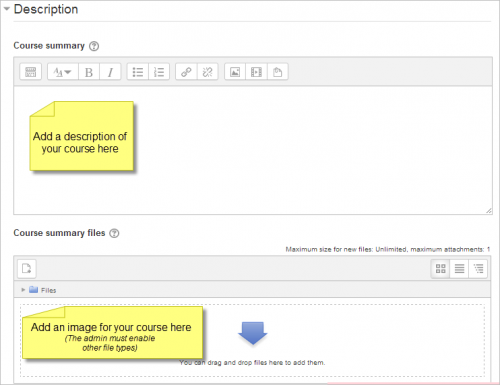
디스크립션
코스 요약
The summary appears on the course listings page. This field is searched when searching for a course and also appears in the Course/Site description block.
The capability moodle/course:changesummary controls whether a user can edit the course summary.
코스 요약 파일
An image (and if allowed by the administrator, other file types) may be attached to the course summary. They will be accessible by anyone from outside of the course just like the course name and/or summary. Only users withmoodle/course:changesummary capability are able to upload/change course summary files. Note that if this is not allowed by the administrator, then no box will appear to upload course summary files.
By default, only jpg, gif and png file types are allowed as course summary files. An administrator can change the allowed file types in Administration > Site administration > Appearance > Courses.
코스 포맷
(These settings are collapsed by default.)
Format
See Course formats
섹션 갯수
This setting is only used by the 'weekly' and 'topics' course formats. In the 'weekly' format, it specifies the number of weeks that the course will run for, starting from the course starting date. In the 'topics' format, it specifies the number of topics in the course. Both of these translate to the number of "boxes" down the middle of the course page.
If the number of weeks/topics is changed for an existing course so that the number is less than the number of course sections containing activities (for example the course contains activities in 3 sections and the number or weeks/topics is set to 2) then when editing is turned on section(s) at the bottom of the course page will be shown with the title 'Orphaned activities'.
The number of weeks/topics may be set to 0, so that only the top general section is displayed on the course page and there are no numbered sections.
By default, the maximum number of weeks/topics is 52, but an administrator can set a different maximum number which will apply to all courses on the site (see below).
섹션 감추기
This option allows you to decide how the hidden sections in your course are displayed to students. By default, a small area is shown (in collapsed form, usually grey) to indicate where the hidden section is, though they still cannot actually see the hidden activities and texts. This is particularly useful in the Weekly format, so that non-class weeks are clear, or if you have quizzes you don't want your students to see.
- TIP: If you choose, these non-available items can be completely hidden, so that students do not even know that sections or an activity in the course are hidden.
코스 레이아웃
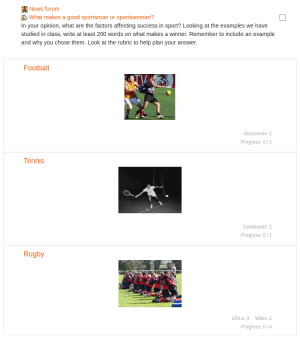
코스 레이아웃 세팅은 전체코스가 하나의 페이지에 보여지냐? 여러페이지에 나누어져보여지냐로 결정된다.
레이아웃 세팅은 현재는 토픽에 적용되고 코어 코스포맷과 contributed collapsed 토픽코스포맷에만 살짝 적용된다.
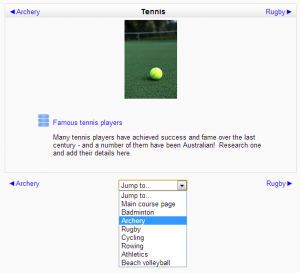
선생님은 드롭다운으로부터 하나의 페이지에 비슷한 스크롤링 포맷을 모든 섹션을 보여줄지 또는 페이지당 하나의 섹션
을 보여줄지 선택할수있다. 만약 페이지당 하나의 섹션이 선택되면 코스페이지는 개별섹션에 링크된 리스트로 나타날것
이다. 만약 개별 섹션이 보여지면 다음 / 이전 섹션들은 섹션의 위 아래의 링크를 통해 접근가능해진다.
스쿨데모싸이트코스에 방문해보자 . The Types of Sport 코스 레이아웃으로 페이지당 하나의 섹션을 볼수있다.
더 상세한 스크린샷은 다음 블러그를 통해 확인하자.Moodle 2.3 – Section per page
모양
(These settings are collapsed by default.)
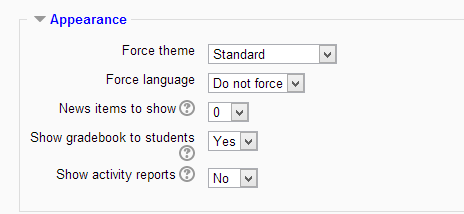
Force theme
If the site administrator has allowed the teacher to set a course theme, this pull down menu will appear with a list of themes on the site. Teachers can use this to choose a different look for the course from the rest of the Moodle site.
Force language
If you force a language in a course, the interface of Moodle in this course will be in this particular language, even if a student has selected a different preferred language in his/her personal profile.
The capability moodle/site:forcelanguage may be allowed by the admin for users who need to override this language (for example, when testing problems in a course in a language they do not know.)
News items to show
How many news items should show the Latest news block. Set it to 0 and Latest news block will not appear.
The Latest News block relies on the use of the associated News Forum. News posted in other forums do not display in the latest News block
Show gradebook to students
Here you can decide whether to allow students to see the link to grades in the Administration block. If your course doesn't use graded activities, it makes sense to disable this. If grades are used and this link is disabled, students can still see their grade from the actual activity itself, such as an assignment
Show activity reports
Here you can decide whether to show students their activity reports. Doing so places a load on the server however, which is why the setting is disabled by default.
Files and uploads
(These settings are collapsed by default.)
Maximum upload size
Here you can decide the largest size of file that students can upload to a course. The site administrator can determine sizes available for the teacher to select.
Editing teachers or other users may be allowed to upload files larger than the maximum size by giving them the capabilitymoodle/course:ignorefilesizelimits
Completion tracking
(These settings are collapsed by default.)
Completion tracking must be enabled for Activity completion. Course completion criteria may also be based upon Activity completion values found in the activity's settings.
Guest access
(These settings are collapsed by default.)
Here you can decide whether to allow logged in users to access the course as a guest, and whether or not they need to enter a password. See Guest role for more information.
Groups
(These settings are collapsed by default.)
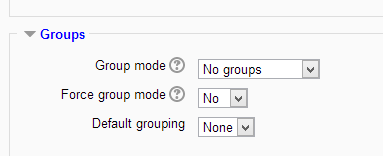
Group mode
Here you can define the group mode at the course level by a pull down menu. "No groups", "Separate groups" and "Visible groups" are the choices. The selected setting will be the default group mode for all activities defined within that course. The group setting can affect what users see in the Participants list and who they can interact with in activities.
Force
If the group mode is "forced" at a course-level, then this particular group mode will be applied to every activity in that course. This will override any activities that may have a special group setting.
Default grouping
If groupings are enabled, a default grouping for course activities and resources may be set.
Role renaming
(These settings are collapsed by default.)
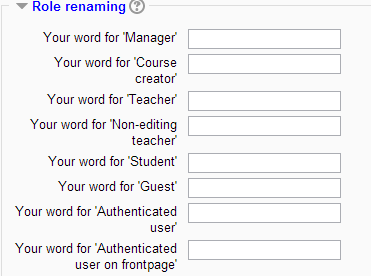
You can rename the roles used in your course. For example, you may wish to rename the Teacher role as "Facilitator", "Tutor" or "Guide". These new role names will appear within the course. For example on the participants and the override permissions pages.
Please note that the site administrator or a course manager may have changed the names or added new roles. These names will appear and the teacher may rename them.
Site administration settings
An administrator can set course default settings in Administration > Site administration > Courses > Course default settings.
The maximum number of weeks/topics may be set for all courses on the site. The default value is 52.
Preventing teachers from editing course settings
Any/all of the following fields - course full name, short name, ID number and category, summary - may be locked to prevent teachers from editing them. To do so:
- Access Site Administration > Users > Permissions > Define roles.
- Click the edit icon opposite the teacher role.
- Change any/all of the capabilities moodle/course:changefullname, moodle/course:changeshortname,moodle/course:changeidnumber, moodle/course:changecategory, moodle/course:changesummary from allow to not set.
- Click the "Save changes" button at the bottom of the page.
'무들 (moodle)' 카테고리의 다른 글
| 무들(moodle 2.9) - 주요 포인트 요약 (0) | 2015.06.10 |
|---|---|
| 무들(Moodle) 2.0 이러닝 강좌 개발 (0) | 2015.06.10 |
| 무들(moodle) 2.9 - 코스 홈페이지 (0) | 2015.06.09 |
| 무들(moodle) 2.9 - 무들 코스 매니징 (0) | 2015.06.08 |
| 무들 (moodle) 2.9 설치하기 for Windows (1) | 2015.06.08 |
